

How To Make Flower Bead Bracelet
Suzanne is an artist and writer who enjoys designing, crafting, and upcycling.
The Cellini spiral is a type of tubular peyote beading, where different-sized beads are used to create the spiral helix effect.
An Italian inspiration, the Cellini spiral was thought to have originated from Benvenuto Cellini, a member of an artist group in the Renaissance Mannerism period, where the figura serpentinata (from Latin—serpentine figure) was used to display human figures in snakelike spiral movements that appealed from all sides.
The first Cellini spiral is always the hardest for a beginner because a lot of beads and patience are always needed to create any Cellini masterpiece. The good news is that the jewellery turns out fairly strong and is easily repairable in later years. Plus, there is no counting after the first bit, so you can watch TV while beading Cellini once the first few rounds are done.
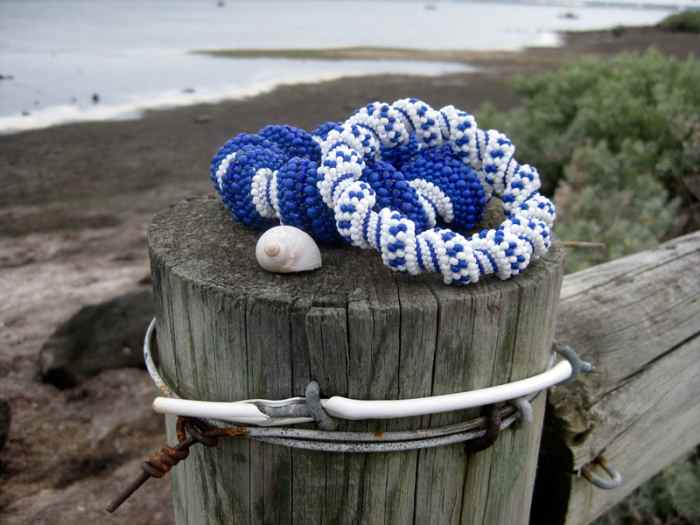
Cellini spirals are a fantastic example of traditional European bead weaving and should be worn to attract comments and attention! Modern Cellini spirals are made with bold and opaque colours, compared to the natural translucent themes used in earlier decades.
So, let's get started on demystifying the process of creating a Cellini spiral . . .
© 2014 Suzanne Day

© 2014 Suzanne Day
Materials Needed
- 1.9mm (12/0) White Delica beads x 4
- 1.9mm (12/0) Blue Delica beads x 1
- 3mm (8/0) White seed beads x 2
- 3mm (8/0) Blue seed beads x 4
- 4.5mm (5/0) Large blue seed beads x 2
- 4.5mm (5/0) Large transparent blue seed beads x 1
Bead amounts will vary, depending on the size of the bracelet. The list of beads is shown in ratios—so for example, for every 1 lot of blue Delica beads, you will need to purchase 4 lots of white Delica beads.
Additional Materials Needed
- Fine, strong beading thread
- An extra fine beading needle
- Sharp scissors
Note: Check that both needle and thread fit through all of the beads multiple times.
Size Notes
This is only a rough guide to bead sizes, and it doesn't matter if you can't purchase the exact sizes listed above.
The idea is to have some very small beads that are uniform in size (Delicas are best for this) and some medium-sized seed beads, and some large-sized seed beads.
It doesn't matter if the medium and large-sized seed beads are uniform in size or not, but the Delicas do need to be uniformly sized for the right effect.
Big Blue Cellini Spiral Bracelet Pattern
The Cellini spiral pattern depends on having different-sized beads which create the lovely spiral effect.
When purchasing beads for Cellini spirals, I recommend buying some Delica beads for the smallest ones, as well as normal/medium-sized seed beads and large seed beads.
Delica beads are often known as Japanese beads, and all of them in the packet are the same size and shape, unlike common seed beads. They are commonly available to purchase online.
The pattern for the blue Cellini spiral bracelet is as follows:
- 1 blue Delica
- 2 white Delica
- 1 white seed bead
- 2 blue seed beads
- 1 large blue seed bead
- 1 large transparent blue seed bead
- 1 large blue seed bead
- 2 blue seed beads
- 1 white seed bead
- 2 white Delica
This is the order you will be following when you begin the bracelet.
Follow this pattern all of the way through to the end to get the same appearance as the blue Cellini bracelet I have made.
Don't panic! The Cellini spiral will automatically tell you what the pattern is as you work on it, though you will need to follow the pattern in the beginning.

Example of supplies needed
© 2014 Suzanne Day
Supporting Diagrams
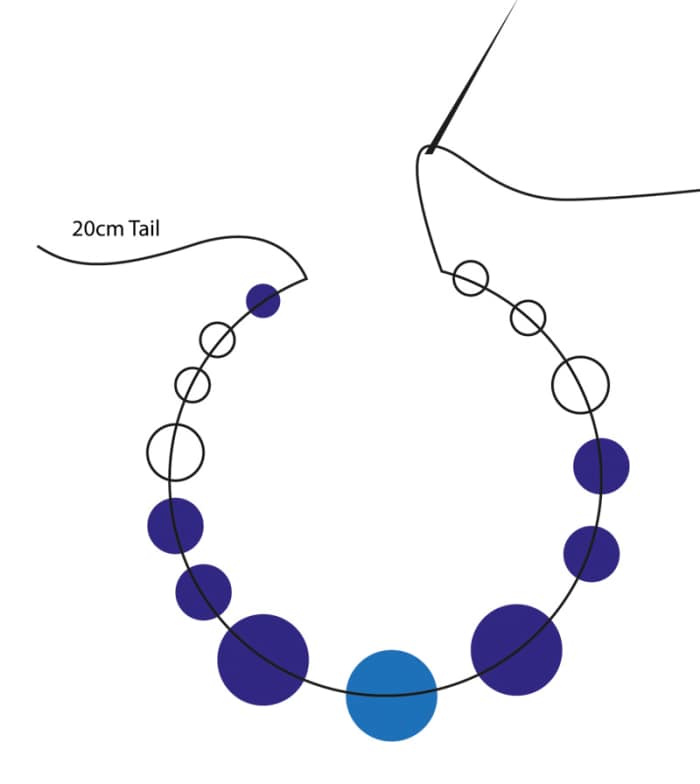
Step 1 - Click to enlarge.
© 2014 Suzanne Day

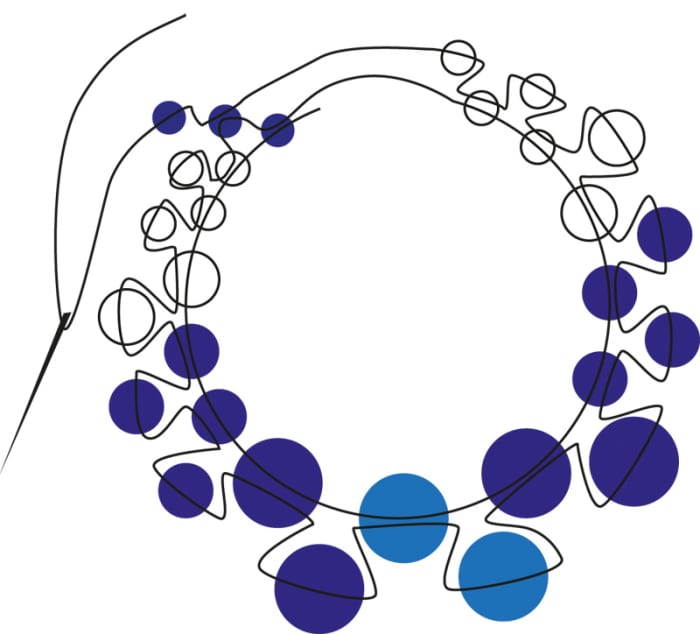
Step 2 & 3 - Click to enlarge. Note the tail is still meant to be there, but is hidden in this diagram.
© 2014 Suzanne Day

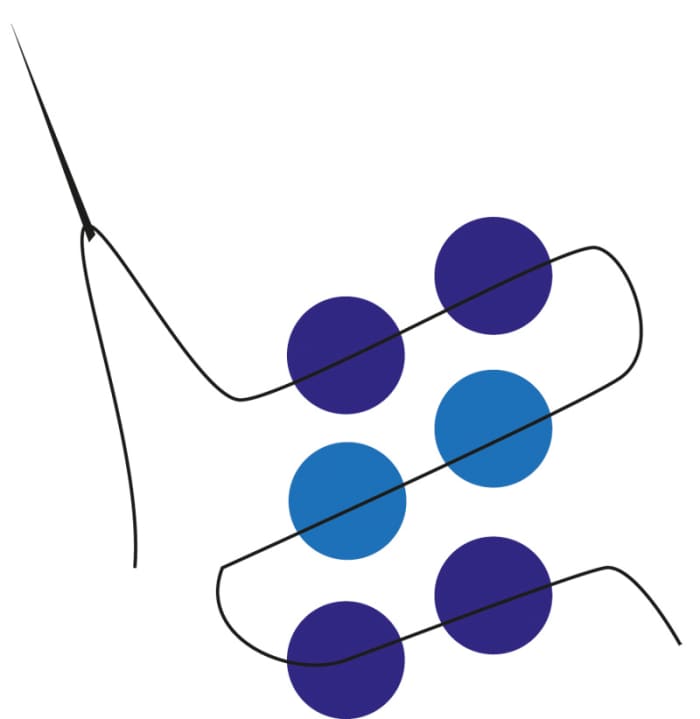
Step 4 - Click to enlarge. Note the tail is still meant to be there, but is hidden in this diagram.
© 2014 Suzanne Day
Step 6 - Click to enlarge. Note the tail is still meant to be there, but is hidden in this diagram.
© 2014 Suzanne Day
Starting the Cellini Spiral
- Cut a long piece of beading thread and thread it through the needle. Thread on all of the beads in the pattern above, in order. Leave a 20cm tail of thread at the end.
- Pass the needle through the first bead, which should be the blue Delica. Pull both tail and needle threads gently but firmly to make sure the blue bead doesn't fall off. Thread on another blue Delica.
- Pass the needle through the next bead, which should be a white Delica. Thread on a white Delica.
- Pass the needle through the next bead, which should be a white Delica. Thread on a white Delica.
- Pass the needle through the next bead, which should be a white seed bead. Thread on a white seed bead.
- You can see that whatever bead you pass your needle through is the bead you need to add next. Just keep following the same steps until you return to the first blue Delica bead again. Then pass the needle through the blue Delica and thread on another blue Delica.
- Keep following the pattern until the work begins to form a Cellini spiral shape (this should happen after about 10 rounds).
You'll find that the first few rounds are really hard to do because the shape hasn't formed yet.
If you keep the thread pulled reasonably firm (but not too tight), you can see a cylindrical tube beginning to form. Always try to work with the beads on top of the cylinder.
A handy tip is to put a piece of masking tape on the bottom end (the tail end) of the work so that you can tell top and bottom.
Keep working until you have about 20cm of beading thread left on the needle end.
Handy Hints
I like to thread tails through Delicas because they hold the thread firmly as the bead holes are small. However, depending on the needle and thread size, Delicas can break if the needle is forced through. Don't force anything! Feel free to switch to the next bead size up if needed.
Note: Each of the two tails should go in a different direction.

Threading a tail through white delicas.
© 2014 Suzanne Day

Attaching new thread
© 2014 Suzanne Day
What to Do When You Run Out of Thread
Running out of thread? There's a technique to attach new thread, and it's really easy!
- Firstly, make sure the needle has finished threading on one bead and has passed through the next bead. Then take the needle off the thread, leaving a 20cm tail.
- Thread a new piece of thread onto the needle. Then, pass the needle through the previous four beads that have just been worked on, leaving a 20cm tail. Continue the work as normal.
- When a few rounds have been completed, you can stop and sew back in the tail parts, so they don't get in the way. Simply thread a tail onto the needle and following the direction of the tail thread, pass it through rows of beads of the same kind. You can see in the photo that I was finishing off one of my tails by threading through white Delicas.
- Continue until you have used up the 20cm tail thread. It doesn't matter if you go through a lot of beads, as this strengthens the bracelet significantly. When tail thread is almost ended, simply cut off the thread as close to the last bead passed through as possible. If you have done enough rounds, there is no need for knots or glue.
To join two ends together, run thread through a colour on one end then through the same colour on the other end etc. Click to enlarge.
© 2014 Suzanne Day
Ending the Bracelet
- When you have a satisfactory length of bracelet and you are ready to end it, match up the ends and see if they look like they fit together correctly.
- If they do, go ahead and start sewing them together (as pictured in the diagram). If the ends do not match well, the first few starting rounds might need to be undone so that the shape is better matched. You can do this by pulling the beads off and unravelling the thread. But whatever you do, keep a tail on the starting round for sewing back in later!
- When the ends are sewn together, run each tail thread through rounds of beads in opposite directions using the technique above in "What to do when you run out of thread" and cut.

White spotted Cellini spiral bracelet.
© 2014 Suzanne Day
Materials Needed
- 1.9mm (12/0) white Delica beads x 4
- 1.9mm (12/0) blue Delica beads x 2
- 3mm (8/0) white seed beads x 3
- 3mm (8/0) blue seed beads x 1
Bead amounts will vary, depending on the size of the bracelet. The list of beads is shown in ratios—so for example, for every 4 lots of white Delica beads, you will need to purchase 2 lots of blue Delica beads.
Additional Materials Needed
- Fine, strong beading thread
- An extra-fine beading needle
- Sharp scissors
Note: Check that both needle and thread fit through all of the beads multiple times.
Size Notes
It is important that the seed beads are not too large as they will not sit well with the Delicas if they are larger seed beads, so use the medium-sized ones as indicated.
White Spotted Cellini Spiral Bracelet Pattern
Here is the pattern for the white Cellini spiral bracelet is as follows:
Round 1
- 1 white Delica
- 1 blue Delica
- 1 white Delica
- 4 white sead beads
- 1 white Delica
- 1 blue Delica
- 1 white Delica
Round 2
- 1 white Delica
- 1 blue Delica
- 1 white Delica
- 1 white seed bead
- 2 blue seed beads
- 1 white seed bead
- 1 white Delica
- 1 blue Delica
- 1 white Delica
This pattern is worked by following Round 1, then Round 2 to get the blue spot pattern. A bit more attention is needed to make sure that the blue spots appear correctly, but this is easy once you practise the pattern.
If any mistakes are made, simply pull at the latest beads and unravel the thread to do the round again.
Gallery of Cellini Gorgeousness

Looking for a Complete Step-by-Step Tutorial?
- Seed Bead Bracelet Tutorials Beading by LuckyStarStitches on Etsy
Want to learn how to make a cellini spiral beaded bracelet? Pippa Lane has made a beginner tutorial of this article detailing step-by-step. Click here to get it!
Biscornu Tutorial
- How to Make a Biscornu: Tutorial With Step-by-Step Instructions
Step-by-step tutorial (with photos) for how to make a biscornu. A biscornu is based upon a counted cross stitch or linen embroidery design. I show you how to sew up all eight edges using whip stitch and more.

© 2014 Suzanne Day
Beadweaver on November 15, 2016:
The Cellini Spiral originated from Virginia Blakelock and NAMED after Cellini, Bead & Button included this fact in one of their books.
moonlake from America on January 05, 2016:
Very pretty bracelets. Thanks for sharing and I'm going to pin it to my craft board.
Marlene Bertrand from USA on August 24, 2015:
These bracelets are gorgeous! The instructions seem intricate, but something I believe I can do. Thanks so much for the fabulous photos. They help a lot.
skperdon from Canada on July 02, 2015:
I'd like to use your pattern, it's very pretty. You instructions are very detailed. Thank you for sharing it Suzanne Day.
Susie Lehto from Minnesota on July 02, 2015:
Suzanne, that is a beautiful bracelet. I love to do beading but have never tried this project. Thank you for the tutorial, I'll remember this hub if I decide to tackle it. - Up votes, pin and tweet!
Suzanne Day (author) from Melbourne, Victoria, Australia on June 23, 2015:
Hi Bubbles, not sure what you mean. I've used these diagrams to make many cellini spiral bracelets and the idea is to go through a bead, add on a bead etc etc as per pictured. Though I have shown beads between each other in the stacking process, this is a better visual for people to follow that having them completely concentric. However, if you are concerned, please tell me which diagram is causing consternation and we can explore it together.
Bubbles on June 22, 2015:
The instructions don't seem to match the outcome - beads should be stacked onto previous rounds, and if you look closely at the bracelets, that is how they are arranged. Whereas the diagram shows them between beads, which is increasing, then doing normal stacking. If using that diagram, one would never be able to make a 'Cellini' spiral.
Jacobb9205 on February 10, 2015:
Wow looks amazing, thank you for the tutorial!
Rebecca Mealey from Northeastern Georgia, USA on September 30, 2014:
These are really, really pretty! I' d love to try Cellini spirals.
Audrey Howitt from California on September 30, 2014:
I think I am going to try making one of these for christmas presents--very cool!!
mumsgather on August 28, 2014:
Great instructions. The only beading I have done so far are switching the beads on my european bead bracelet around. This looks complicated for me but then you've got nice pictorial instructions. That really helps.
Suzanne Day (author) from Melbourne, Victoria, Australia on August 27, 2014:
Hi everyone, thank you for your thoughtful comments. I'm glad you liked the tutorial and I just want to point out that it really isn't hard to get the hang of it, the main issues are being able to see the beads and needle and thread properly and also to have the right needle (it's not a normal sewing needle).
These special needles go through the seed beads very easily. I find cellini stitch is very addictive once you have done a few because you only have to count it out a few times, then the pattern is embedded in the bracelet and you can focus on other stuff while doing it!
Nancy Carol Brown Hardin from Las Vegas, NV on August 27, 2014:
So beautifully done. Your talent is unmistakeable. I could never do this, even with your excellent step-by-step instructions and photos. But I really enjoyed thinking about it!
Barbara Tremblay Cipak from Toronto, Canada on August 27, 2014:
these are very beautiful and you've put the instructions together so clearly as well. I normally never wear anything on my wrists, not even a watch - gheesh no rings usually either (just one) - but honestly because these look so sturdy and they sort of jump out, I would probably where it with the right outfit
Tanya Jones from Texas USA on August 24, 2014:
Lovely bracelets. Love your instructions. Videos aren't always as easy to follow as one would think. I will definitely refer back to this when I make one.
Stephanie Henkel from USA on August 23, 2014:
What pretty beaded bracelets! They look complicated to make, but your instructions and step-by-step photographs are clear and easy to follow. I may even get the urge to try it one day! Voted up and pinned!
Susan Hazelton from Sunny Florida on July 22, 2014:
I love the look of this pattern. Your tutorial is terrific, easy to follow and understand. Absolutely awesome.
Colleen Swan from County Durham on June 25, 2014:
Wonderful and informative hub. Makes one want to take up a new hobby
LD on April 03, 2014:
This is a great tutorial. the bracelets look great and you really feel like making one right away. Well done !
Suzanne Day (author) from Melbourne, Victoria, Australia on March 29, 2014:
Thank you to everyone for your kind comments! Writer Fox, I probably wouldn't sell these beaded bracelets because they take awhile to make - I doubt anyone would want to pay $999 for them (if they do, let me know!) so they're definitely a "me" project for beaders.
Writer Fox from the wadi near the little river on March 29, 2014:
What a cool idea! You've given great instructions with terrific photos. I think you should sell this great bracelets. Enjoyed, voted up and pinned!
Helena Ricketts from Indiana on March 26, 2014:
Wow! I love this and am going to have to try it. What a great article and the instructions are fantastic. Thanks for sharing this!
Paula from The Midwest, USA on March 25, 2014:
Hello Suzanne, what a neat bracelet! I haven't seen anything like these, and I am not sure I could create one. If I ever could though, I know your instructions would definitely be part of the reason though! Thanks for sharing, they are really cool bracelets!
RTalloni on March 24, 2014:
Just beautiful! My affinity for cobalt blue would fit perfectly with this project. Thanks for all the detail. Your photos make me want to reach into the screen and slip one on my wrist!
Rose Clearfield from Milwaukee, Wisconsin on March 24, 2014:
Your Cellini spiral bracelets are fabulous! You did a great job with the beadwork as well as the photos. It's always nice to find other beadweavers, especially on HubPages. I would love to attempt this technique sometime.
Susan Hazelton from Sunny Florida on March 24, 2014:
This is a beautiful bracelet. Your tutorial is terrific. I am saving it to use later. Thanks for sharing it.
Natasha from Hawaii on March 23, 2014:
Absolutely fantastic tutorial! I love your photos and diagrams, and the bracelet is stunning. I'm an avid crafter, but I've never really done much beadwork. This makes me want to try! Pinning!
Sally Gulbrandsen from Norfolk on March 23, 2014:
Stunning work Suzanne. I love the finished bracelet and the instructions are just perfect. Voted up pinned and tweeted.
Have a lovely evening
Sally
Susan from India on March 23, 2014:
Wow.... Suzanne I just love reading your this type of creative hubs. The bracelet looks very beautiful. Thanks for sharing. Voted up and awesome.
Shasta Matova from USA on March 23, 2014:
Beautiful bead bracelets - with such great step-by step directions. I hadn't heard of cellini bracelets, but the spiral effect is super cute!
Christina Lornemark from Sweden on March 23, 2014:
Wonderful hub with detailed step by step tutorial and beautiful photos. I wish I had the time to try this myself, but until then I will have your hub as inspiration. Thanks for sharing
Devika Primić from Dubrovnik, Croatia on March 23, 2014:
Wow! I love the idea of making bracelets the creative photos are incredible this hub deserves a vote up, useful interesting, beautiful and useful.
Patricia Scott from North Central Florida on March 23, 2014:
Great instructions and I love the way these look. I am sending this to my daughter ...she is making bracelets that are similar to these right now. Pinned and shared
Angels are on the way to you ps
Audrey Howitt from California on March 23, 2014:
I love beads and bead work--will be coming back here!
sujaya venkatesh on March 23, 2014:
simply aesthetic
Claudia Mitchell on March 23, 2014:
What a glorious hub! That white bracelet with the blue spots would look great on my arm. I am definitely trying this. Love your photos by the water too. Great instructions. Shared around.
swilliams on March 22, 2014:
This is a great article! Making Bracelets is all the rave and your Article really displays how to so providing great detail. Thanks Voted Up.
Suzanne Day (author) from Melbourne, Victoria, Australia on March 22, 2014:
Thanks FlourishAnyway, I really felt "in the mood" to create this one as I finally finished both bracelets after a few months of working at them and then enjoyed a trip to the seaside yesterday for photography. Glad you liked it and looking forward to digging up some more beading hubs in the future and taking the projects to fancy places to photograph them (so much fun!)
FlourishAnyway from USA on March 22, 2014:
Suzanne, This is a fantastic craft hub. The step-by-step is detailed, those photos are gorgeous, and it looks doable. Voted up +++ and pinning!
How To Make Flower Bead Bracelet
Source: https://feltmagnet.com/crafts/Cellini-Spiral-Bracelet-Pattern
Posted by: lavalleyoakedy.blogspot.com
0 Response to "How To Make Flower Bead Bracelet"
Post a Comment